Every record collector knows that keeping your records clean is vital to getting the best sound quality out of your collection. Turntables are analog devices and your stylus is “dumb” this doesn’t mean it can’t result in fantastic audio quality but it doesn’t have any electronic brains behind it. The stylus’s one and only job is to travel through the grooves of your record and vibrate as the walls of the groove move it, these vibrations are then picked up by magnets or coils so they can be sent down the tone arm and amplified. Because of this dumb nature your stylus cannot differentiate between the wall of a record groove and a piece of dust or dirt. Thus these imperfections also vibrate the stylus and thus are sent down the tone arm and to your amplifier and speakers where they are heard as pops or crackles.
Thus ensuring that your stylus and records are clean can minimise these imperfections in playback. Do note that even the cleanest record may still have some static, pops and clicks. Many find this adds to the charm and analog nature of records versus the more sterile nature of digital audio.
For cleaning your stylus please see Tip 3 in our top 5 tips blog post Here.
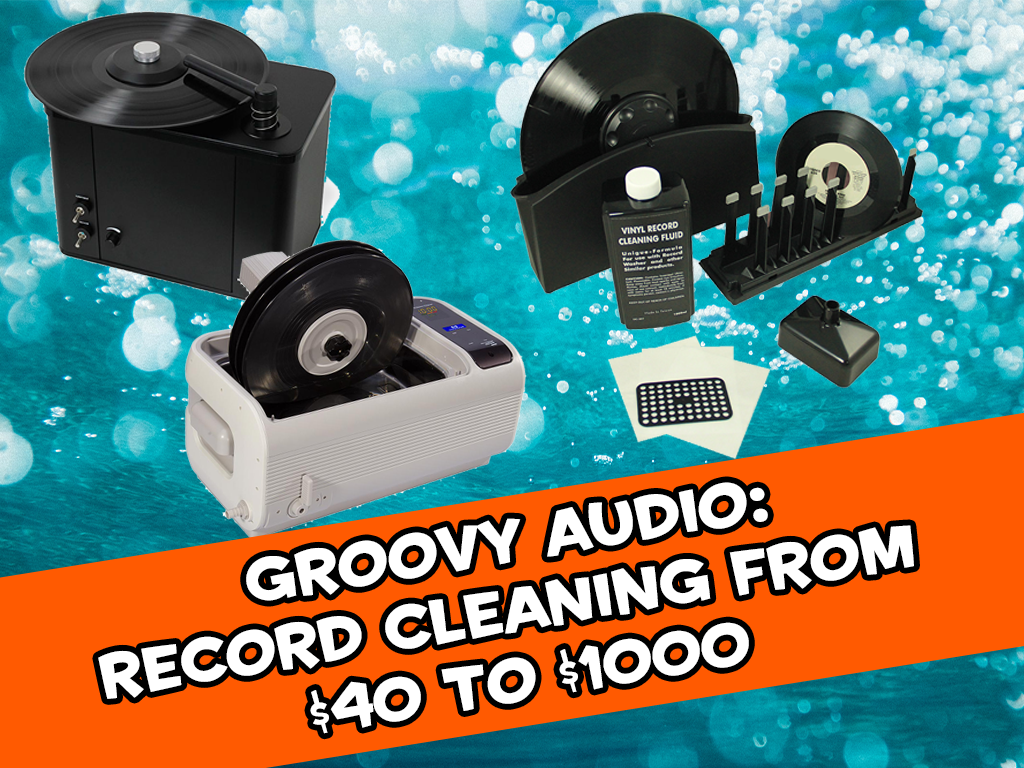
In this blog post we will run through all your record cleaning options from $40 up to $1000, all of these options are solid choices for cleaning your records which one you should use depends on the size of your collection, how dirty your records are, your budget and how much time you can dedicate to cleaning your records.
Around $40:
At this price point your cleaning will be entirely manual but using a combination of record cleaner and a velvet brush you can still achieve solid results.
Record Cleaner 1 Litre
Velvet Brush
Method:
- Place the record on a clean and flat surface.
- Using a velvet brush or micro-fibre cloth wetted with record cleaner, gently work around the surface of the record with the grooves. Avoid wetting the label!
- Rinse the surface with cold filtered water
- Turn the record over and repeat the process. To help avoid wetting the label, we recommend using the Professional Record Cleaning Work Mat
- Once clean, we recommend a final rinse to both sides with distilled water.
- Allow to drip dry for a moment. Using a clean, dry microfiber cloth moistened with Isopropyl Alcohol, wipe any residual water from both sides of the record and allow it to air dry.
- Place the newly cleaned record into a NEW inner sleeve to prevent re-contamination.
If you can spare a few more dollars getting a Professional Record Cleaning Work Mat will make this process easier, using a Carbon Fibre Brush to remove dust before cleaning and before every play is also recommended. We sell combination Carbon Fibre and Velvet brushes.
Around $150:
At this price point we are still doing some manual work but now we can use a spin cleaner, this is a small basin with a rotating spindle that you put your record on and some brushes that clean both sides of the record at the same time. The basin is also filled with record cleaning solution which gets evenly coated onto the record by the spinning action.
Method:
- Place the record onto the cleaning spindle and screw on the label protector
- Fill the record washer up with the provided cleaning solution upto the fill line indicated in the manual
- Place the spindle into the spin cleaner
- Using the grip points on the label protector section of the spindle rotate the record through the brushes and solution, doing a few full rotations is best, also lifting the record out a couple of times will allow dirt to settle at the bottom
- Remove the record and spindle and unscrew the protectors to free the record
- Place the record on the provided drying rack to air dry
- You can now use the funnel and filters to return the solution back to the bottle making sure that all debris is caught by the filter
- Place the newly cleaned record into a NEW inner sleeve to prevent re-contamination.
Rinsing the record with distilled water afterwards is recommended after this process if possible.
Around $300:
At this price point we move up to an automatic spin clean machine, operation of this is basically identical to the above manual spin cleaner but the machine rotates the records for you which can result in an overall better result as well as being simpler to operate.
Around $700 to $900
At this price point we have record vacuum machines. These machines suck but in a good way. Unlike the two previous methods these machines work on one side of your records at a time, however they are far quicker and more effective in their operation. They use a motorised platter and vacuum system to suck out the dirt and cleaning solution from the grooves of your records.
Method:
- Place the record on the platter
- Attach record clamp / label protector
- Turn on the platter motor
- Drop a few drops of cleaning solution onto the surface of the record
- Use a brush tangent to the record grooves to spread the solution across the surface of the record using the spinning of the platter to do the work rather than moving the brush itself
- Move the vacuum into position
- Engage and lower the vacuum
- Once a few rotations have occurred and the record surface is dry and clean disengage the vacuum
- Repeat steps 1-9 on flip side of the record
Each record vacuum machine may operate slightly differently so consult the manufacturer’s resources or manual for your specific machine before use.
Also see This Video for a demonstration
Around $800 to $1000
This price point overlaps with the previous one and here we get ultrasonic cleaners, although entry level smaller ultrasonic cleaners are around the same price as a vacuum machine most of them sit at a higher price point at the $1000ish mark
These cleaners use high frequency ultrasonic sound waves to agitate a cleaning solution which is able to penetrate the grooves of a record and dislodge contaminants. This method is highly effective and also allows for more than one record to be cleaned at a time (This is the only method in this list that allows for this). Ultrasonic cleaners are so effective that they are most commonly used in the Jewelry and Medical industry.
Every ultrasonic machine is slightly different in its operation so consult the manual or manufacturer’s resources for your specific machine before use. Below we will give a rundown of the general workflow:
- Prepare your Cleaning Solution mixing the manufacturer specified ratio of cleaning solution and distilled water
- Fill the ultrasonic tank / bath
- Mount the records on the spindle
- Attach spindle to the ultrasonic cleaner
- Run the ultrasonic cleaning cycle
- Remove records from spindle
- Rinse records with distilled water and leave to air dry
For a video of how we ultrasonically clean our records see Here.
Hopefully this blog post can help you figure out the best cleaning method for your record so you can get the most out of your collection.